A strong custom hat starts long before the first sample is sewn. For a brand, retailer, promotional company, or wholesale buyer, the most important early document is often the tech pack: a clear set of instructions that explains how the hat should look, fit, feel, and be finished.
A reference photo or logo file can communicate the general idea, but it rarely answers the production questions a manufacturer must resolve. What is the crown profile? Which fabric should be used? How wide should the brim be? Where should the embroidery sit? Which closure, sweatband, labels, and packaging are required?
A factory-ready tech pack reduces guesswork during quoting and sampling. It also gives your team and your manufacturing partner a shared reference for reviewing revisions and approving bulk production.
What Is a Custom Hat Tech Pack?
A custom hat tech pack is a product specification document for one hat style or one closely related group of colorways. It combines visual references with measurable details, material requirements, artwork instructions, and packaging information.
For headwear, a tech pack needs more than a front-facing fashion sketch. Hats are three-dimensional products with curved crowns, brims, closures, internal components, and decoration that may be visible from several angles. Your document should therefore help a sample room understand the complete product, not just the logo placement.
A tech pack does not need to be perfect before you contact a manufacturer. However, the clearer the brief, the easier it is to identify suitable materials, estimate development requirements, and avoid preventable sample revisions.
1. Start With a Clear Product Overview
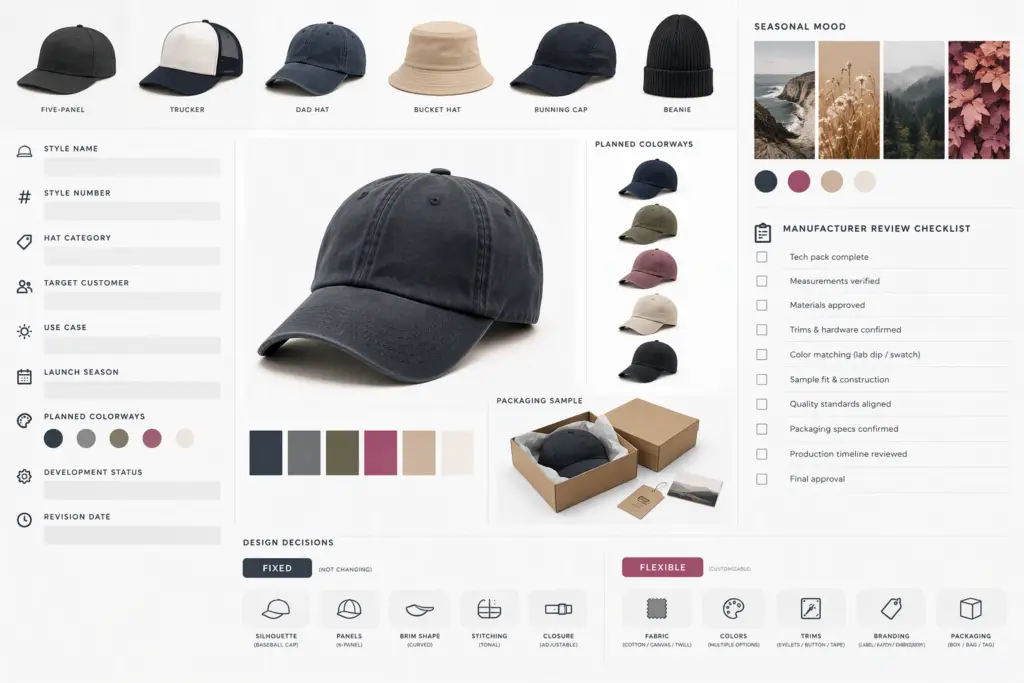
Open the tech pack with the basic identity of the product:
- Style name and internal style number
- Product category, such as 5-panel cap, trucker hat, dad hat, bucket hat, running cap, or beanie
- Intended customer and use case
- Target season or launch window
- Planned colorways
- Development status and revision date
Explain what the hat needs to achieve. A fashion label may prioritize a particular silhouette and hand feel. An outdoor brand may care more about lightweight construction, ventilation, packability, or weather resistance. A promotional buyer may prioritize branding visibility, repeatability, and packaging efficiency.
This context helps a manufacturer understand which details are fixed and which may be open to technical suggestions.
2. Add Technical Drawings From Multiple Views
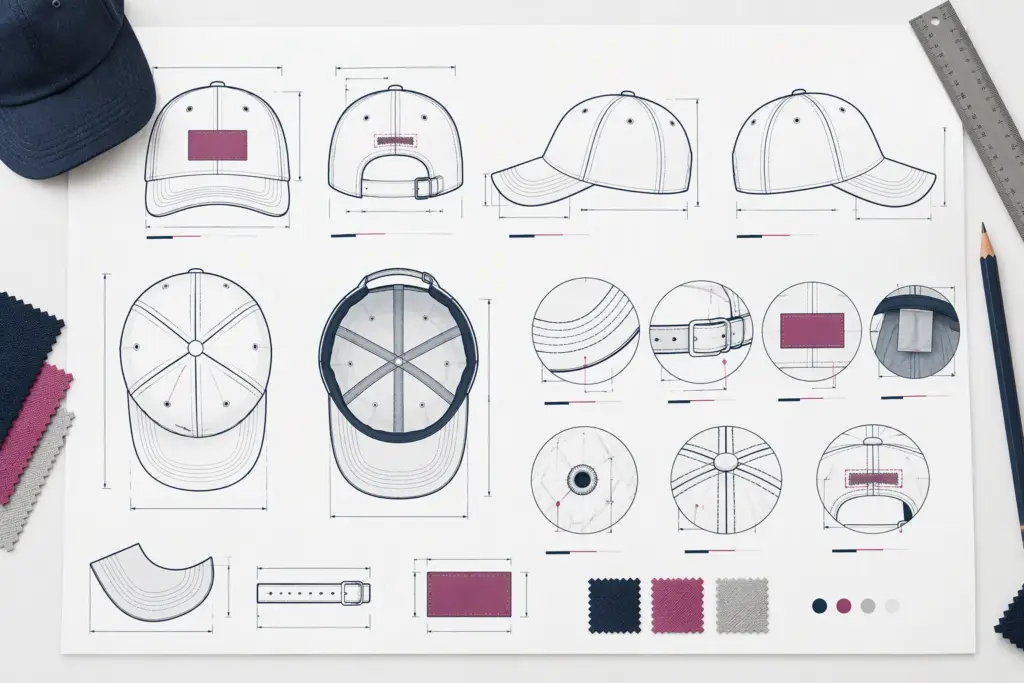
Include clean technical flats or annotated images showing the hat from the angles needed to understand the design. Depending on the style, useful views may include:
- Front
- Back
- Left and right sides
- Top view
- Inside view
- Detail views of the brim, closure, patch, label, or ventilation
Mark each design feature directly on the drawing. For example, identify the number of panels, seam lines, eyelets, front patch area, back embroidery, closure type, and any contrast components.
A mood-board image can remain in the document for visual direction, but it should not replace a technical drawing. Reference images may show proportions or construction details that do not match your intended product, so label them as inspiration rather than final instructions.
3. Specify the Crown, Brim, and Fit
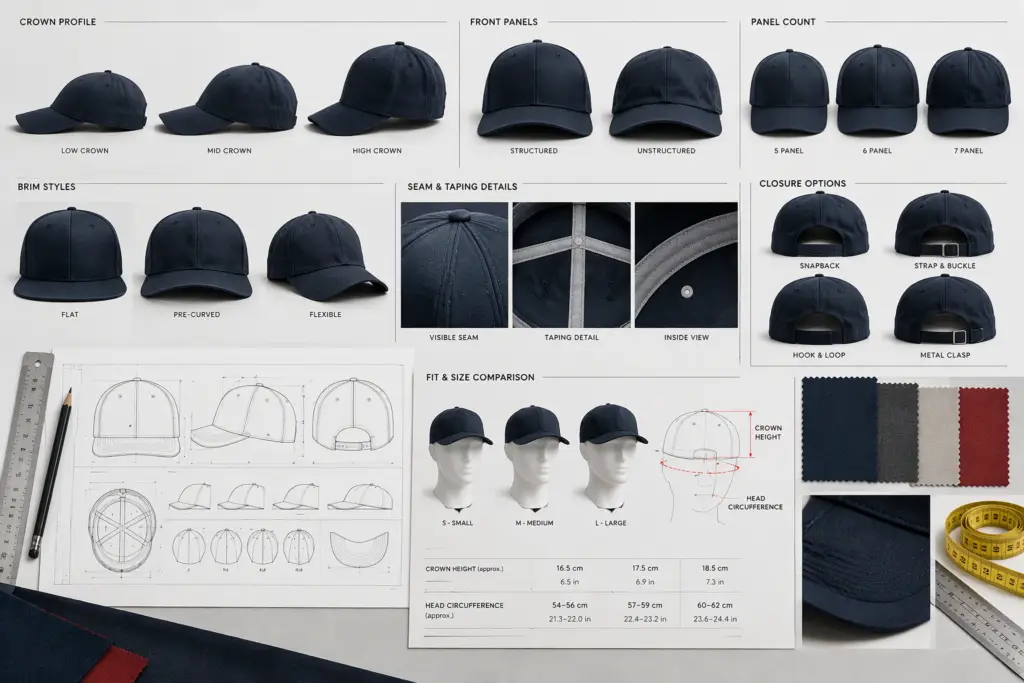
Small changes to shape can significantly change how a hat looks and feels. Include as many of the following specifications as your design stage allows:
- Crown height
- Crown profile: low, mid, or high
- Structured or unstructured front panels
- Number of panels
- Brim length and shape
- Flat, pre-curved, or flexible brim
- Seam treatment and taping requirements
- Head circumference or finished measurement range
- Closure adjustment range
- Fit preference, such as standard, shallow, deep, or extended size
If you are developing a new silhouette, explain the fit through measurements and reference samples rather than relying only on terms such as “premium fit” or “classic shape.” Those phrases can mean different things to different teams.
For adjustable hats, show the measurement points clearly. For fitted or size-based hats, include the complete size range and the grading rules between sizes.
4. List Fabrics, Trims, and Components
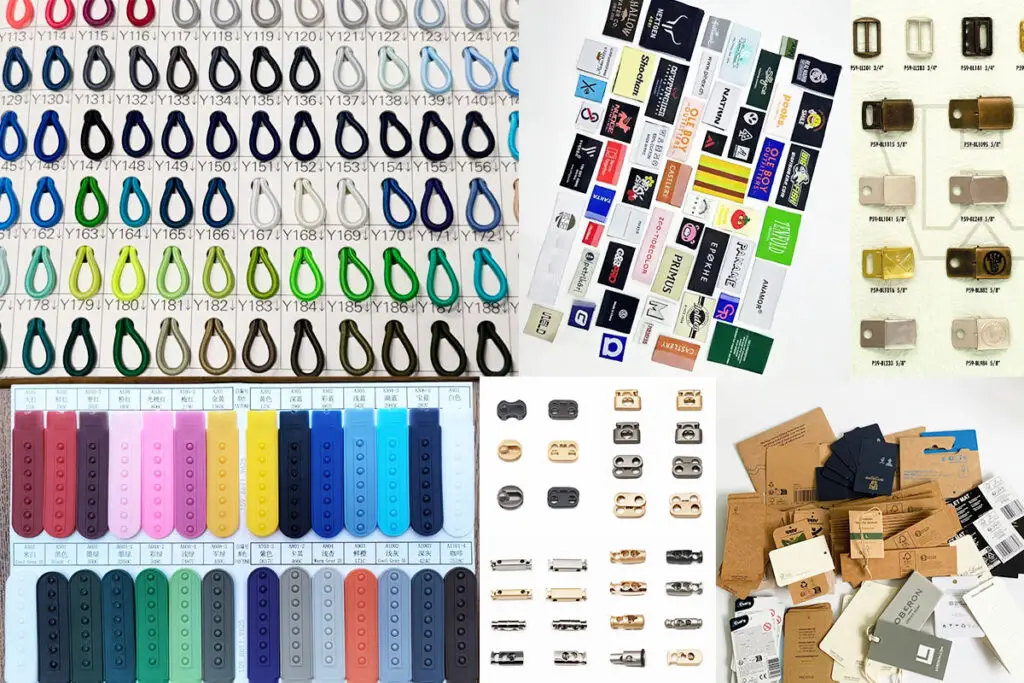
Create a bill of materials, often called a BOM, for every material and component used in the hat. A useful BOM may include:
- Main fabric and fiber content
- Mesh, lining, or backing material
- Brim board or brim insert
- Sweatband
- Buckle, snap, strap, elastic, or hook-and-loop closure
- Eyelets, ventilation holes, and rivets
- Woven labels, care labels, and size labels
- Thread and seam tape
- Patch base, embroidery backing, or print substrate
- Polybag, hangtag, carton, and other packaging items
When possible, include fabric weight, finish, color reference, and supplier or approved alternative. If a specific material is not mandatory, write “or equivalent subject to approval” rather than leaving the field blank.
For color control, provide Pantone references or physical swatches when available. A digital screen can display the same color differently depending on the device, so color approval should be based on an agreed physical or standardized reference.
5. Define Logo and Decoration Requirements
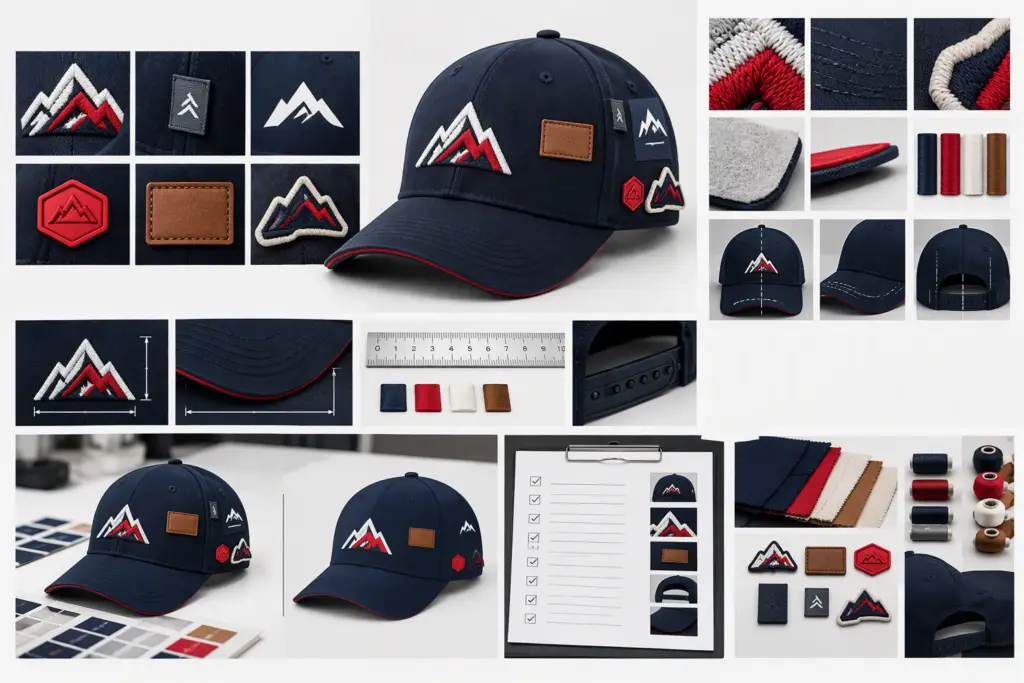
Decoration is one of the most important parts of a custom hat specification. State exactly what will be used and where it will be placed:
- Embroidery, woven label, printed logo, rubber patch, leather patch, appliqué, or another method
- Artwork file format and color information
- Decoration dimensions
- Placement from seams, brim, or closure
- Thread or ink colors
- Stitch direction, edge treatment, or backing requirements
- Whether the decoration should be tonal, high contrast, raised, flat, distressed, or reflective
Detailed artwork should be supplied as a separate production file as well as placed in the tech pack. If the logo contains small text or fine lines, ask the manufacturer to review whether the chosen decoration method can reproduce those details clearly at the intended size.
Do not approve decoration from a digital mockup alone. A physical sample can reveal issues such as puckering, distortion on curved panels, thread density, color contrast, patch stiffness, or an unsuitable placement.
6. Include a Measurement and Tolerance Chart
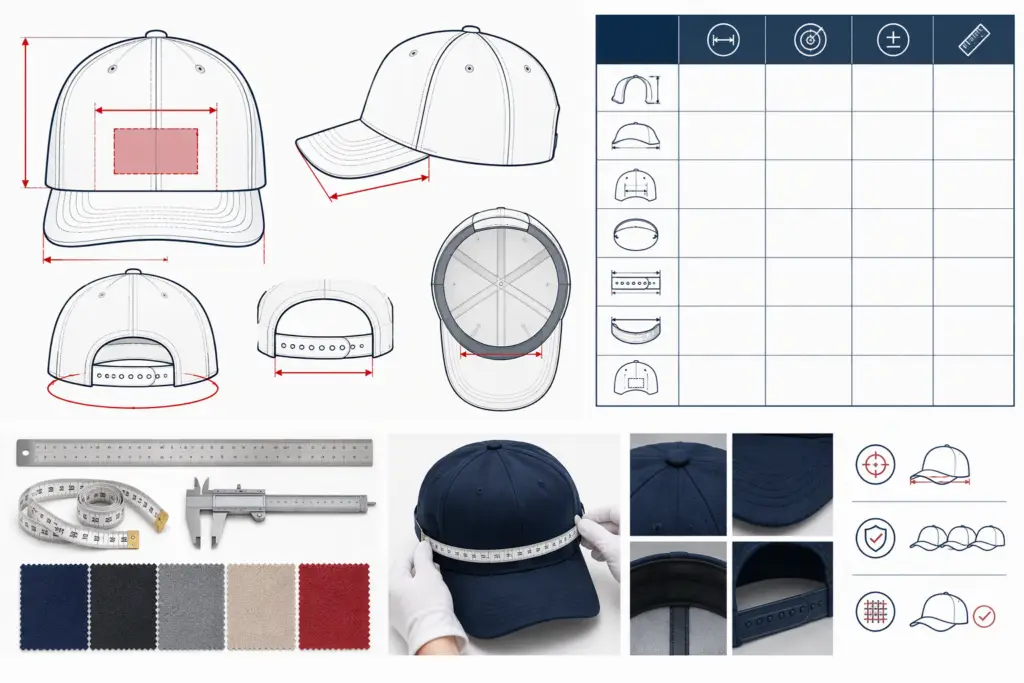
A measurement chart turns general fit language into measurable instructions. Identify each measurement point with a diagram and list:
- Required measurement
- Target value
- Tolerance
- Measurement method
Possible measurement points include crown height, brim length, front panel width, opening circumference, closure length, sweatband width, and patch placement. The exact points will vary by hat construction.
Tolerances should be realistic for the material and construction. If a measurement is especially important to fit, appearance, or compatibility with another product, mark it as a critical measurement for review.
7. Document Labels, Packaging, and Carton Requirements
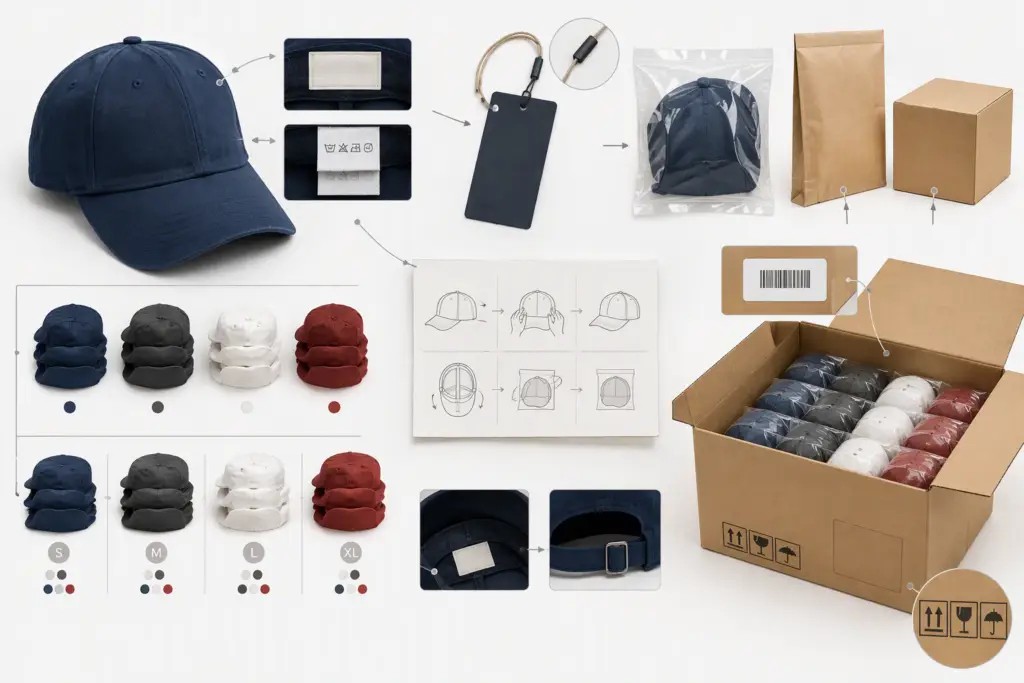
Packaging decisions should be included before sampling, not added after bulk production has started. Specify:
- Main label and care-label content
- Label positions and attachment method
- Hangtag artwork and attachment
- Individual polybag or paper packaging requirements
- Barcode or SKU placement
- Folding or shaping instructions
- Carton quantity and carton-marking requirements
- Assortment by color and size, if applicable
If your product will be sold through retailers or distributed internationally, confirm the labeling and packaging information required for your sales channels and destination markets. Your manufacturing partner can help identify practical packaging options, but your business remains responsible for confirming the requirements that apply to your product.
8. Set Sample Approval Criteria
A tech pack should explain how the sample will be evaluated. Before sampling, decide which items require approval:
- Overall shape and proportion
- Fit and adjustment range
- Fabric color and hand feel
- Brim shape and flexibility
- Seam quality and symmetry
- Logo size, position, and decoration quality
- Labels and internal finishing
- Packaging presentation
Keep a version history in the tech pack. After each revision, update the date and version number, record what changed, and remove outdated files from the active production folder. This simple step helps prevent a previous artwork file or superseded measurement chart from being used by mistake.
Common Tech Pack Mistakes to Avoid
Using only a logo and a reference photo
These files may communicate the concept, but they do not define construction, materials, fit, or finishing.
Mixing final instructions with optional ideas
Use clear labels such as “approved,” “required,” “preferred,” and “open for factory recommendation.” This prevents suggestions from being mistaken for fixed requirements.
Omitting the inside of the hat
Sweatbands, seam finishing, labels, backing, and internal comfort details affect both perceived quality and wearability.
Leaving packaging until the end
Late packaging changes can affect cost, carton planning, labeling, and the way the finished hats arrive.
Sending outdated files
Use one master tech pack, a consistent file-naming system, and a visible revision date. Share the same approved version with everyone involved in sampling and purchasing.
A Practical Pre-Sampling Checklist
Before requesting a quote or sample, confirm that your package includes:
- Product overview and style number
- Technical drawings or annotated reference images
- Crown, brim, closure, and fit requirements
- Material and trim specifications
- Color references
- Logo artwork and decoration instructions
- Measurement chart and tolerances
- Labels and packaging details
- Sample approval criteria
- Revision date and file version
If some details are not finalized, identify them clearly. A transparent list of open decisions is more useful than an apparently complete document containing assumptions.
Final Thoughts
A good custom hat tech pack is not about creating a long document for its own sake. It is about making important product decisions visible, measurable, and easy to review. When a manufacturer can understand the intended construction, decoration, fit, and packaging, the sampling conversation becomes more focused and production risks are easier to manage.
Whether you are launching a new headwear collection, expanding an apparel line, or preparing a wholesale program, start with the information that affects the final product most. Then work with your manufacturing partner to review material options, construction details, and sample requirements before moving into bulk production.
Ready to Develop Your Custom Hats?
Have a concept, reference sample, logo, or draft specification ready? Send your design brief and project requirements to Juz Tech Caps for a custom hat manufacturing quote or development inquiry. Sharing your target style, quantity, decoration method, materials, and delivery needs will help the team review your request more efficiently.